CONVENTIONAL NON-DESTRUCTIVE TESTING
Conventional Nondestructive Testing (NDT) describes a process in which welds, materials or equipment can be examined for various types of discontinuities such as cracks, weld discontinuities, corrosion, or wear that does not require the destruction of the component being tested.
Non-destructive testing has become a widely used solution for numerous types of industrial project in the manufacturing, construction, plant operation and other engineering sectors. There are many different NDT methods available, each of which has both advantages and disadvantages. Our NDT team provides qualified inspectors with the capability to choose the right method to solve the inspection or testing challenge that any industrial project might face. As a result, you can be sure of both safe operation and improved quality while reducing overall cost. We perform shop or field inspections wherever required to any codes, standards or customer specification.
Conventional NDT Services We Provide:
VISUAL TESTING (VT)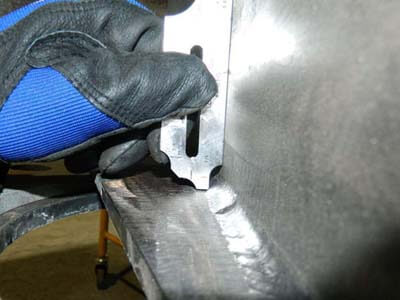
Visual inspection is one of the most common and most powerful means of non-destructive testing. Visual testing requires adequate illumination of the test surface and proper eye-sight of the tester. To be most effective visual inspection does however, merit special attention because it requires training (knowledge of product and process, anticipated service conditions, acceptance criteria, record keeping, for example) and it has its own range of equipment and instrumentation. It is also a fact that all defects found by other NDT methods ultimately must be substantiated by visual inspection.
While visual inspection is limited to materials surface-only examination, it often detects the most damaging defects. Visual inspection (abbreviated) by the American Society for Non-destructive Testing (ASNT) of welded components requires inspectors to have a broad knowledge of many technologies, including welding, destructive testing, non-destructive testing and metallurgy, as well as the correct terminology for each.
ADVANTAGES:
- Inspection performed rapidly and at low cost.
- Ability to inspect complex sizes and shapes of any material.
- Minimum part preparation required
ULTRASONIC WELD SCAN
In Ultrasonic Testing (UT), very short ultrasonic pulse waves with center frequencies ranging from 0.1 to 15 MHz are transmitted into materials to detect internal flaws or to characterize materials. UT is often performed on steel and other metals and alloys, though it can also be used on concrete, wood and composites. We offer onsite flaw detection services for inspection of structures, components, shafts, welds etc. We are equipped with state of art digital flaw detectors and our technicians are well qualified, certified for reliable & faster inspection.
APPLICATIONS:
- Most weld discontinuities including cracks, slag, lack of fusion, lack of bond, accurate thickness measurement possible
- To measure intergranular corrosion quantitatively
ADVANTAGES:
- Most sensitive to planar type defects
- Test results known immediately
- High penetration capability
- Requires access from only one surface
ULTRASONIC THICKNESS GAUGING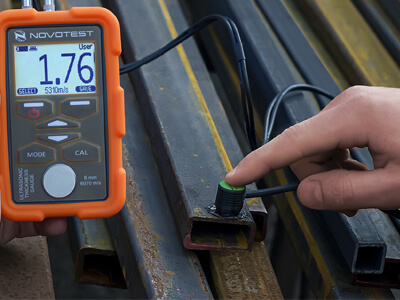
UTG is a method of performing non-destructive gauging (measurement) of the local thickness of a solid element (typically made of metal) based on the time taken by the ultrasound wave to return to the surface. This type of measurement is typically performed with an ultrasonic thickness gauges. We offer on-site thickness gauging services for assessing corrosion in process plant, piping & equipment. We are equipped with state of art ultrasonic thickness gauges having the latest through coat technology where removal of paint from the surface is not required.
ADVANTAGES:
- Requires access from only one surface
- Rate of corrosion & erosion is measured
HIGH TEMPERATURE THICKNESS GAUGING (UP TO 350 DEGREE C)
Thickness measurement at elevated temperature is a special category. Standard transducers are not designed to withstand elevated temperatures and will get damaged / destroyed due to varying thermal expansion coefficients of the materials used to construct them. Variation in material temperature affects sound velocity and accuracy of thickness measurements. We use special transducers & couplant with A-Scan gauges to perform this task.
OXIDE SCALE THICKNESS MEASUREMENT
We offer on-site oxide scale thickness measurement services to measure the thickness of oxide scale build-ups inside boiler tubes. The gauge simultaneously displays the metal thickness of the boiler tube and the thickness of the oxide layer. Knowing the thickness of the oxide scale helps predict tube life.
MAGNETIC PARTICLE INSPECTION (MPT)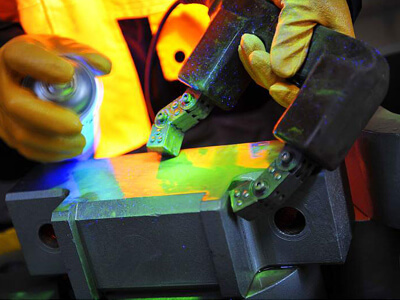
MPI is a NDT technique for detecting surface and subsurface discontinuity in ferromagnetic materials such as iron, nickel, cobalt and some of their alloys. We offer on-site magnetic particle inspection services using yoke type and coil type magnetizing equipment; dry powder, wet magnetic particles & wet fluorescent magnetic particle technique.
Magnetic Particle Inspection (MPI) is the economical and comparative faster non-destructive test method used widely in Aerospace, Locomotive, automotive, power generation, nuclear, petrochemical industries. The most common examples are testing of crank shafts, cam shafts, connecting rods, engine gears, landing gear, bearing caps, engine blocks, motor shafts, engine bolts, nuts, washers, threaded bars, studs, piping joints (fabricated joints, welds) in power generation and petrochemical industries, etc.
APPLICATIONS:
- Most weld discontinuities open to or near the surface
- Most suitable for cracks, laps, seams, voids, pits, subsurface holes, and other surface or slightly subsurface, discontinuities in ferromagnetic materials
ADVANTAGES:
- Relatively economical and expedient
- Test equipment is considered portable
- Unlike liquid penetrant, magnetic particle can detect some near surface discontinuities
- Can inspect through thin coatings
LIQUID PENETRANT TESTING (LPT)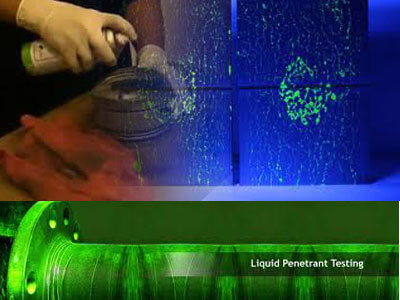
LPI is widely applied as low cost inspection method used to locate surface breaking defects in all non-ferrous materials and ferrous materials; although for ferrous components magnetic particle inspection is often used. LPI is used to detect casting, forging & welding surface defects such as hairline cracks, surface porosity, leaks in new products and fatigue cracks on in-service components.
We offer on-site liquid penetrant testing services using contrast or fluorescent penetrant for highly sensitive inspection. We offer on-site liquid penetrant inspection services. For detecting of surface breaking cracks in non-magnetic materials, we use both color contrast and fluorescent penetrant for highly sensitive inspection.
APPLICATIONS:
- It is used to inspect metals for surface defects
- Weld discontinuities open to surface i.e. cracks, porosity and seams
ADVANTAGES:
- It can be used on a wide variety of materials: ferrous and nonferrous metals and alloys, fired ceramics, powdered-metal products, glass, and some types of organic materials
- Portable, relatively inexpensive equipment
- Expedient inspection results
- Results are easily interpreted
- Requires no electrical energy except for light source
- Indications may be further examined visually
- Adapted to volume processing permitted 100 percent surface inspection
RADIOGRAPHY TESTING (RT)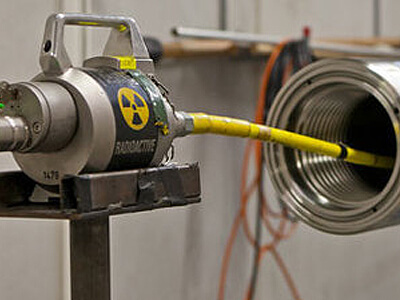
Radiographic inspection is based on the exposure by Either an X-ray machine or a radioactive source (Ir-192, Co-60, or in rare cases Cs-137) can be used as a source of photons. Since the amount of radiation emerging from the opposite side of the material can be detected and measured, variations in this amount (or intensity) of radiation are used to determine thickness or composition of material. Penetrating radiations are those restricted to that part of the electromagnetic spectrum of wavelength less than about 10 nanometers.The principle of Industrial Radiography Testing is Differential Absorption. This means that different materials absorb different amount of radiation based on the thickness difference, density and presence of defect.
Generally for detection medium is films which consist of an emulsion-gelatin containing radiation sensitive silver halide crystals, such as silver bromide or silver chloride, and a flexible, transparent, blue-tinted base. When x-rays, gamma rays, or light strike the grains of the sensitive silver halide in the emulsion, some of the Br- ions are liberated and captured by the Ag+ ions. This change is of such a small nature that it cannot be detected by ordinary physical methods and is called a “latent (hidden) image.” However, the exposed grains are now more sensitive to the reduction process when exposed to a chemical solution (developer), and the reaction results in the formation of black, metallic silver. It is this silver, suspended in the gelatin on both sides of the base, that creates an image.
Radiographic testing provides a permanent record in the form of a radiograph and provides a highly sensitive image of the internal structure of the material.
RT APPLICATIONS INCLUDE:
- Castings & Forgings
- Boiler internal & external inspections
- Pistons, gears, bolts etc
- Machined parts
- Plastic and glass
- Weld seams
- Precision machined parts
- Welder certification
X-RAY SOURCES:
A high energy X-ray machine can be used. It is often important to use a high accelerating voltage to provide the electrons with a very high energy. This is because in a braking radiation source the maximum photon energy is determined by the energy of the charged particles.
RADIOISOTOPE SOURCES:
- These have the advantage that they do not need a supply of electrical power to function, but they do have the disadvantage that they can not be turned off. Also it is difficult using radioactivity to create a small and compact source that offers the photon flux possible with a normal sealed X-ray tube.
- Gamma rays are produced by subatomic particle interactions such as electron positron annihilation, radioactive decay, fusion, fission or inverse Compton Scattering in astrophysical processes.
Cobalt-60 and caesium-137 have only a few gamma energies, which makes them close to monochromatic. The photon energy of cobalt-60 is higher than that of caesium-137, which allows cobalt sources to be used to examine thicker sections of metals than those that could be examined with Cs-137. Iridium-192 has a lower photon energy than cobalt-60 and its gamma spectrum is complex (many lines of very different energies), but this can be an advantage as this can give better contrast for the final photographs.
INTERNAL X-RAY RADIOGRAPHY:
The X-Ray Crawler is similar to conventional radiography however an x-ray source tube on a crawler device is run inside the pipe to each weld. Film is wrapped around the welds and the source tube is excited. The film is then developed in a mobile dark-room on location. The technique is quick and can inspect on average 150 welds per day. The advantages of x-ray crawlers are their speed and the short exposure time. The film is also crisper and much less grainy when compared to conventional radiography using Iridium type sources.
APPLICATIONS:
- Capable of inspecting pipes ranging from 5 1/2″ diameter to 72″ diameter
- Designed for onshore and offshore applications
- Functions in remote areas with rugged terrain
- Works in extreme temperatures
CRAWLER FEATURES:
- Traction unit on crawlers built to navigate inclines up to 45″
- Crawlers fitted with anti-runaway circuitry and retrieval systems
- Cycle times minimized to meet high production rate
- Modular crawler design for maximum versatility
APPLICATIONS:
- By this we can perform SWSI and DWSI
GAMMA RAY RADIOGRAPHY:
Gamma Radiography works the same way as x-rays . However, to produce effective gamma rays only a small pellet of radioactive material sealed in a titanium capsule is needed, instead of a bulky x-ray producing machine.
As isotopes are easily transported, gamma radiography is very useful in remote areas where it can be used to check for defects in wields in pipelines carrying gas or oil. An advantage using gamma radiography is that no power is required and thus eliminates the need of x-ray sets, which require power to operate which may not be readily available at a remote site.
EDDY CURRENT TESTING (ET)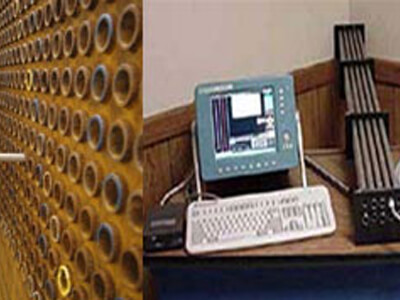
WHAT IS EDDY CURRENT TESTING?
Eddy current testing is an advanced Non destructive testing (NDT) technique. It is used to simplify the quality and maintenance of material, products, construction in different spell of testing process. Eddy current testing is used to reach the optimum surface and subsurface fault in every portative product and material. The range of quality control manufacturing functions is present pertaining Eddy current inspection principles. Contemporary Eddy current NDT technique has upgrade functions in complicated engineering applications, heat exchanger tube testing, advanced Aerospace component testing etc.
EDDY CURRENT TESTING PRINCIPLE
In its most basic form the single-element ECT probe a coil of conductive wire is excited with an alternating electrical current. This wire coil produces an alternating magnetic field around itself in the direction ascertained by the right-hand rule. The magnetic field oscillates at the same frequency as the current running through the coil. When the coil approaches a conductive material, currents opposed to the ones in the coil are induced in the material eddy currents.
Variations in the electrical conductivity and magnetic permeability of the test object, and the presence of defects causes a change in eddy current and a corresponding change in phase and amplitude that can be detected by measuring the impedance changes in the coil, which is a telltale sign of the presence of defects.This is the basis of standard (pancake coil) ECT. ECT has a very wide range of applications. Because ECT is electrical in nature, it is limited to conductive material. There are also physical limits to generating eddy currents and depth of penetration
ADVANTAGES:
- Computerized record keeping: partial.
- Faster inspections.
- Better detection capabilities.
- Easier analysis because of simpler scan patterns.
- Improved positioning and sizing because of encoded data.
- Faster identification, location and isolation of faults.
LEAK TESTING (LT)
Leak testing is a highly precise means of leak detection and is used to locate and quantify leaks in a wide variety of industries and applications including: valves, vessels, heat exchangers, seals, flange connections, tubes, steam turbines and condensers, vacuum systems, distillation towers and many other systems and components.
Leakage is a flow of material either out of an orifice or through a material (permeation). It is an admission or release of media. Generally, leak testing is the measurement of the amount of media leaking through material over time. There are different methods used to measure the amount of released media, and various media can be used as tracer gas. The tracer gas testing determines the change in concentration or an actual leak rate of a tracer gas on the lower pressure side of a test part. Typical tracer gases are helium, hydrogen or SF6.
Selecting the best leak test method is actually an economic decision that balances the cost of meeting the leak test specifications within the conditions and requirements of production. While leak testing may look to be a simple procedure, the process involves a combination of both science and skills. The operator must ensure the equipment is functioning properly and the process is highly dependent upon the operators experience.
ADVANTAGES:
- Preferred for destructive testing (pressurize to burst).
- Performs superbly for testing at pressures above 500PSI.
- Simulates “real-world” conditions for parts designed to contain or pass fluid.
POSITIVE MATERIAL IDENTIFICATION (PMI)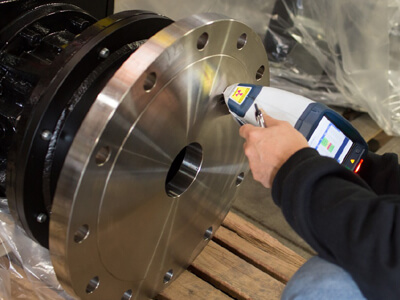
PMI, the analysis of a metallic alloy to establish composition by reading the quantities by percentage of its constituent elements. Temperature is often the first and easiest-to-find indication of a developing problem and can be quickly used as a screening technique for situations that will benefit from further analysis. A non-contact IR thermometer allows you to stay a safe distance from the object and get the most accurate readings across a wide range of temperatures, thus,the term non contact.
Qualitative NDT Inspection offers PMI testing services through experienced, trained personnel who can assure quality of service. The material scan and testing services can be performed on-site before the pieces go into the production process. PMI can be utilized on a variety of part sizes from large complex parts to things as small as the weld fill material on the pieces.
ADVANTAGES:
- Isolate finished welds to validatefiller material composition and dilution rates.
- Highly specific and accurate results, essential to good quality control.
- Recover lost material traceability.
- Rapidly verify alloys in seconds.
- Assurance for verification of specialty metal parts.
- Reduced risk of company liability with documented safety standards.
- Fast audit times and our long-standing experience.
- Quick results for product verification and sorting of product that may have been inadvertently mixed.
- Confirm the integrity of process piping, valves, and reaction vessels Pipes,Tubes,Forged bars,Valves,Flanges,Weld seams ,Tanks,Vessels Structural supports,Bolts, rivets, and other fasteners
VACUUM BOX TESTING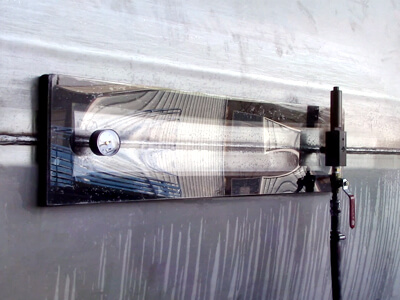
Vacuum box testing is an integral part of a tank inspection process as recommended by API and other international standards to establish the condition of a tank bottom plate weld or shell to bottom plate weld.
Vacuum box is a portable box having a viewing window large enough to view the complete test area and to allow sufficient light to enter the box for proper examination. The box used, shall be capable of producing and holding a pressure differential of 5 to 12 psi.
ADVANTAGES:
- Increased efficiency.
- Reduced operator fatigue.
- Increased operator safety.
- Field proven durability & reliability.
- User replaceable seals.
HARDNESS TESTING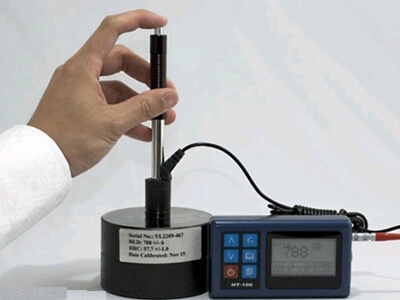
Hardness is the measure of how resistant solid matter is to various kinds of permanent shape change when a force is applied. Macroscopic hardness is generally characterized by strong intermolecular bonds, but the behavior of solid materials under force is complex; therefore there are different measurements of hardness: scratch hardness, indentation hardness, and rebound hardness.
Hardness is dependent on ductility, elasticity, plasticity, strain, strength, toughness, viscoelasticity, and viscosity. Metals undergo different processes before being converted into a final product. Each process can have an effect on the mechanical and chemical attributes of metal. For example, the strength of steel is determined by its chemical composition and micro structural transformations. Macroscopic variables are used to control the final product quality. Hardness is one characteristic of metal that can be easily monitored.
ADVANTAGES:
- Increased efficiency.
- Reduced operator fatigue.
- Increased operator safety.
- Field proven durability & reliability.
- User replaceable seals.
FERRITE TESTING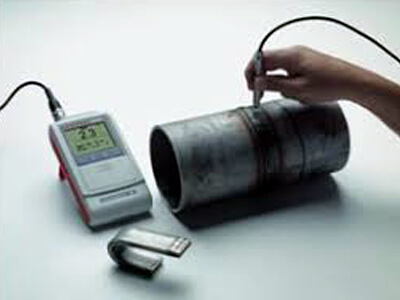
Austenitic, Duplex, Super-duplex stainless steels require adequate proportion of ferrite in the product to obtain acceptable corrosion resistance and strength and especially resistance to Stress Corrosion Cracking (SCC). The laboratory based destructive method such as micro structural analysis on the test specimen or sample obtained from the batch of the product or components provides statistical quality assurance. In order to guarantee the acceptable ferrite content in the final product, ferrite measurements are performed on the actual product. Ferrite measurement using Ferritoscope is a non-destructive test method which assures the quality of the product without the need of expensive laboratory based destructive test methods.
Use of acid resistant steel and in particular acid resistant clad steel creates a series of problems of technological and metallurgical nature. During welding of acid resistant homogenous steel of purely austenitic structure with clad steel, the base of which is of ferritic-pearlitic structure, mixing of acid resistant weld metal of autsetnitic structure with low-carbon weld metal of ferritic-pearlitic structure takes place. The applied technology and selection of welding materials should guarantee such joint, where the ferrite content in the weld ranges from 2 up to 8% with manual welding and up to 10% with automatic welding.
ADVANTAGES:
- The test requires only a light contact which leaves no mark.
- Ferrite values are determined directly and quickly.
- Highly portable digital technology.
- Testing instrument meets all requirements of ANSI/AWS A4.2 and DIN EN ISO 8249.
- Calibration is traceable to internationally approved IIW secondary calibration standards.
- Variable calibration in both Ferrite Number (FN) and % Ferrite (FN) using AWS Standards.
HOLIDAY INSPECTION/SPONGE TEST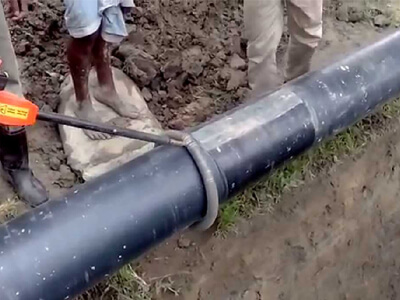
HIGH VOLTAGE / LOW VOLTAGE
Holiday test or a Continuity test is one of the Non Destructive Test method applied on protective coatings to detect unacceptable discontinuities such as pinholes and voids. The test involves checking of an electric circuit to see if current flows to complete the electrical circuit.
A Holiday test or Continuity test is performed by applying low voltage (connected in series with an LED or noise-producing component such as a piezoelectric speaker) across the chosen path. If the electrical flow is detected then the test area is termed as conductive indicating presence of discontinuities such as pinholes and voids. Three types of commercially manufactured electrical holiday detectors are readily available to the industry. The low voltage (wet sponge) type of holiday detector which is applicable for use on high dielectric protective coating with maximum dry film thickness of 20 mils (.51 mm) and both pulsating & continuous DC high voltage (spark type) holiday detectors that can be used successfully on high dielectric strength protective coating with dry film thickness’ ranging from a few mils to fractions of an inch.
An electrical holiday detector is a device which locates areas or points on a coated conductive concrete substrate where there is a great difference in electrical resistance between the exploratory electrode on the coated surface and the underlying structure. The fact that most protective coatings used on concrete structures are highly resistant to a flow of electrical current makes this method of testing quite practical.
ADVANTAGES:
- It is fairly easy to use and extensive training is not required.
- It is a non-destructive test.
- The wet sponge is low cost.
HEAT TREATMENT SERVICES
When welding some base materials and for some service conditions, preheating and/or post weld heat treatment may be a requirement. These types of thermal treatments are generally required in order to ensure suitable weld integrity and will typically prevent or remove undesirable characteristics in the completed weld. Any form of heat treatment is costly since it demands extra equipment, extra time, and extra handling. For these reasons, heat treatment should only be undertaken after careful consideration of the advantages it may offer. In certain cases heat treatment will be mandatory, as with heavy sections of low alloy steels, whereas in other cases, it will be a justifiable precaution against early failure in service.
Heating During Welding provides the following benefits:
- Reduces the levels of thermal stress.
- Provides compensation for high heat losses.
- Minimizes the rate of weld hardening.
- Reduced porosity in the weld.
- Reduced hydrogen cracking.
- Improved microstructure of heat affected zone.

